Smarkant
Convert your IKEA Bekant table into a smart IoT device
This work extends the IKEA-Hackant project from Robin Reiter , who reverse engineered the controller board of an IKEA Bekant motorized adjustable table. He added an Arduino board and four buttons to the controller, so that you can store two table positions and easily recall them.
 Project Files
All of the project files (schematic, PCB layout, firmware source code) are hosted on GitHub:
https://github.com/grappendorf/smarkant
You can find Robin's work in his GitHub repository . This Video shows his project development and the operation of the modified table.
Robin has already explained how the Bekant controller and his Arduino circuit works. So please refer to his documentation, if you want to learn more about this. In a nutshell: the current table height is received as packets on a LIN bus and the table motor is controlled by simulating presses of the original up and down buttons of the controller.
Hackant becomes smart
In my project i added an ESP-12F module (ESP8266) to the Arduino. I first tried to compile the Arduino code targeting the ESP8266 platform, but since the LIN bus code directly accesses the ATmega hardware, i've canceled this approach. Communication between the ESP8266 and the ATmega328P is done through I2C, but one could also use SPI.
The ESP8266 gives us WiFi and quite some processing power to implement a REST interface to control our table remotely. This REST API could for example be used to implement a smartphone app or a desktop widget. We could also implement a web app directly on the ESP8266.
This firmware implements an AWS IoT client, which is essentially an MQTT client. I'v written an Alexa Skill and an AWS Lamda function that sends a REST message to the AWS IoT device which in turn sends an MQTT message to the table. This allows me to control the table with voice commands (but one can certainly argue about whether this is more convenient than simply pressing a button).
Here is an overview of this system:
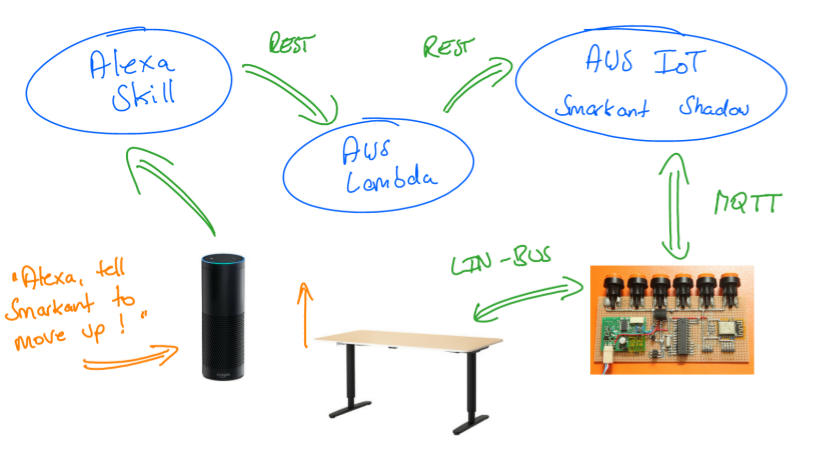
The Alexa voice command contains the name of the skill "Smarkant", by which Alexa determines the right HTTP endpoint that must be called in order to perform the request. In our case the endpoint is an AWS Lambda function written in JavaScript. This function uses the aws-sdk-js JavaScript library to communicate with the AWS IoT backend and update a JSON object that represents the table device. The AWS IoT backend then sends an MQTT message to the device. This message is eventually handled by the ESP8266 which in turn sends an I2C command to the ATmega328P that eventually controls the table motors.
Schematic and Prototype
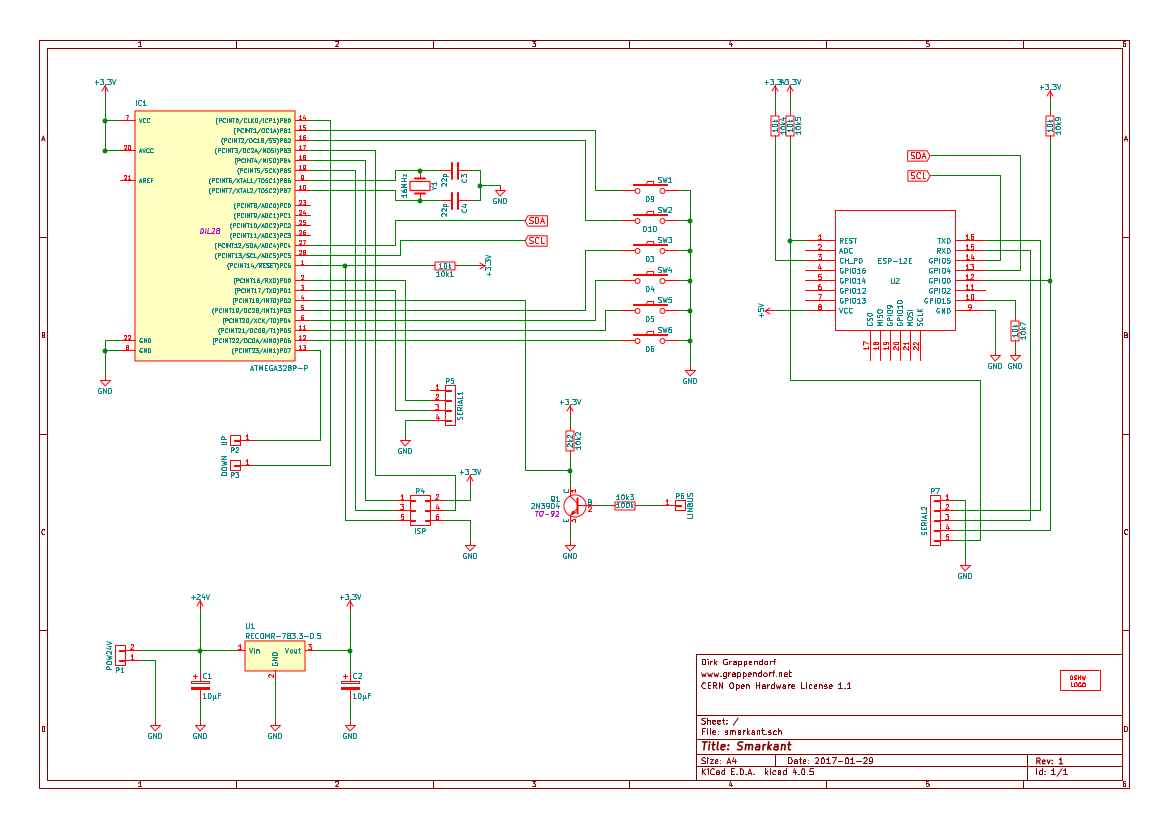
The KiCad schematic files can be found in the smarkant-kicad sub-directory of the projects GitHub repository .
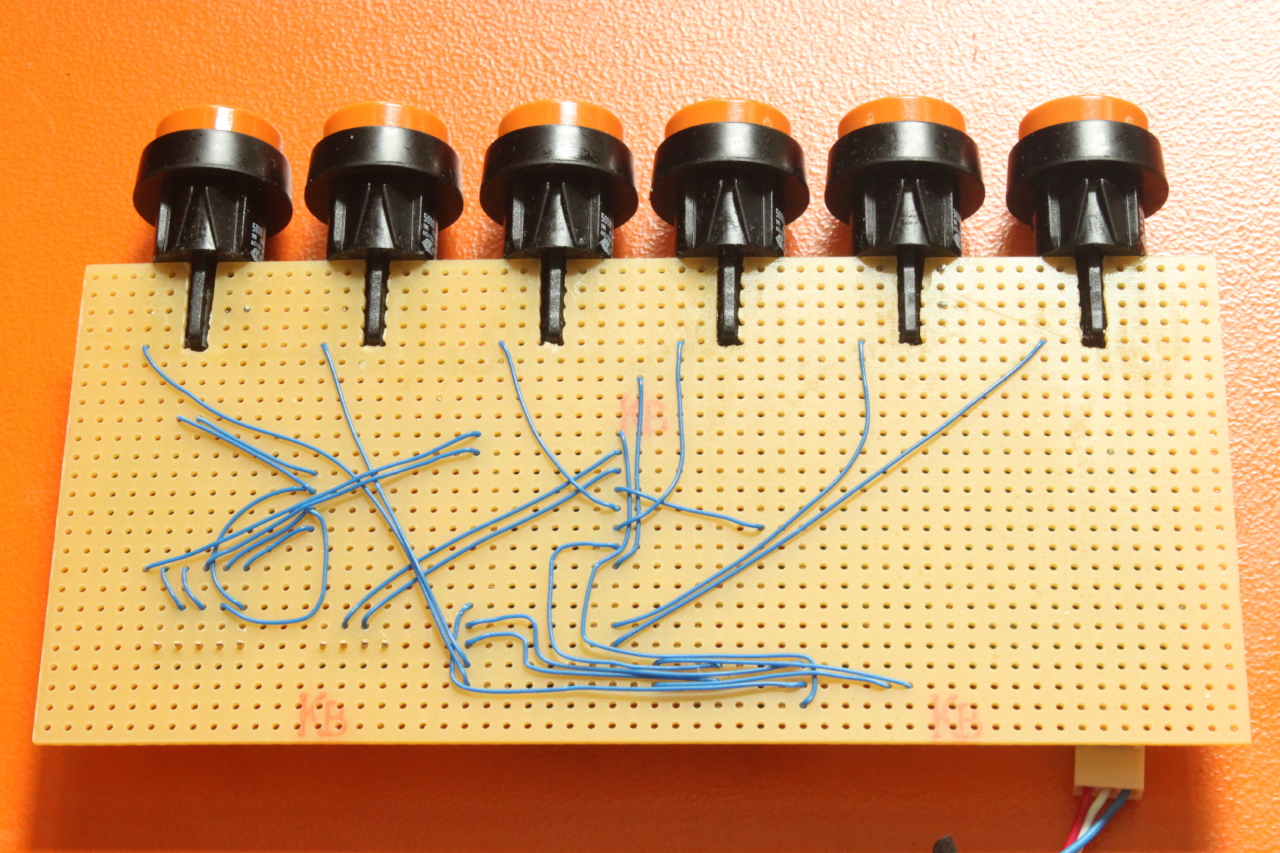
This circuit is quite simple. It contains a basic ATmega328P and ESP8266 configuration and both chips are connected through the SDA and SCL lines. A DC/DC converter creates 3.3V from the 24V power supply. Q1 is used to retrieve the LIN bus signal. I also added two more buttons, so i now have 4 memory slots.
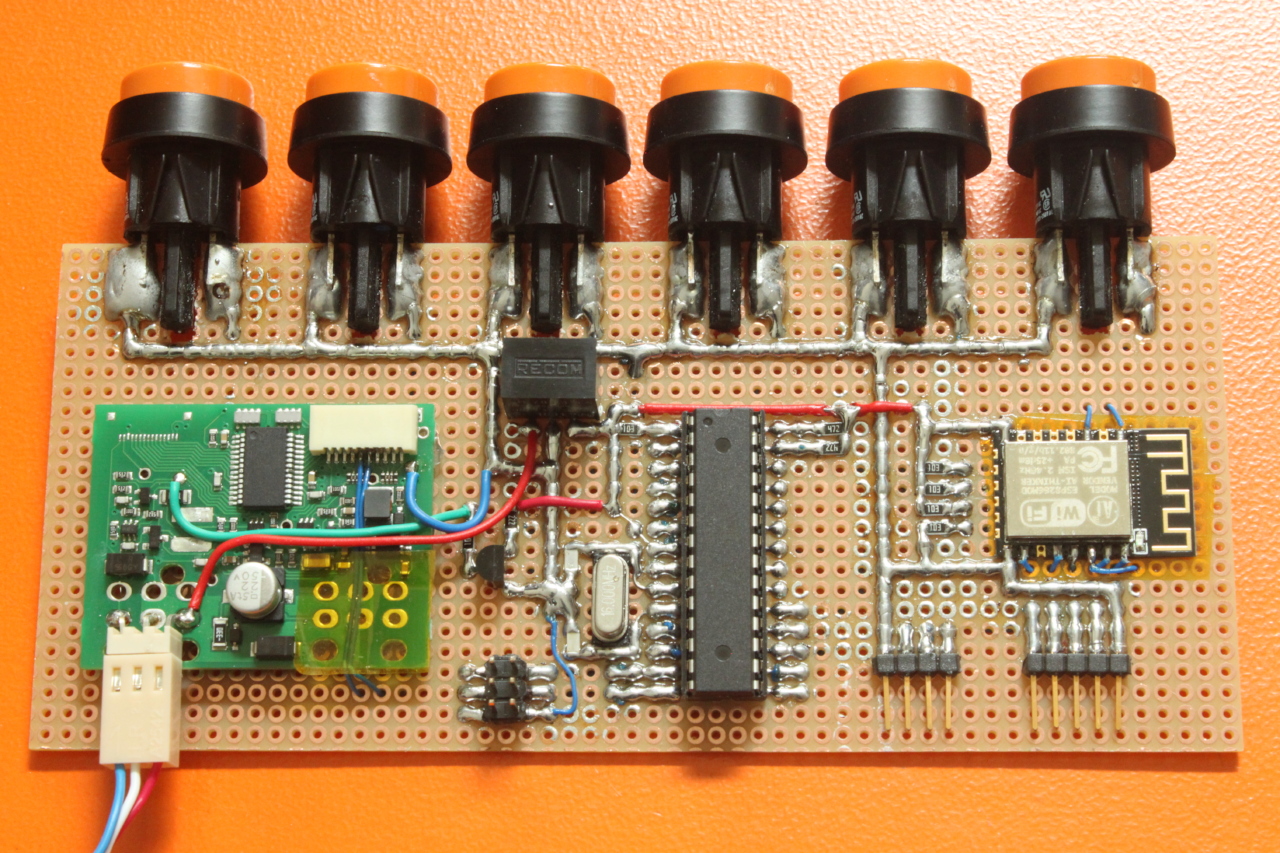
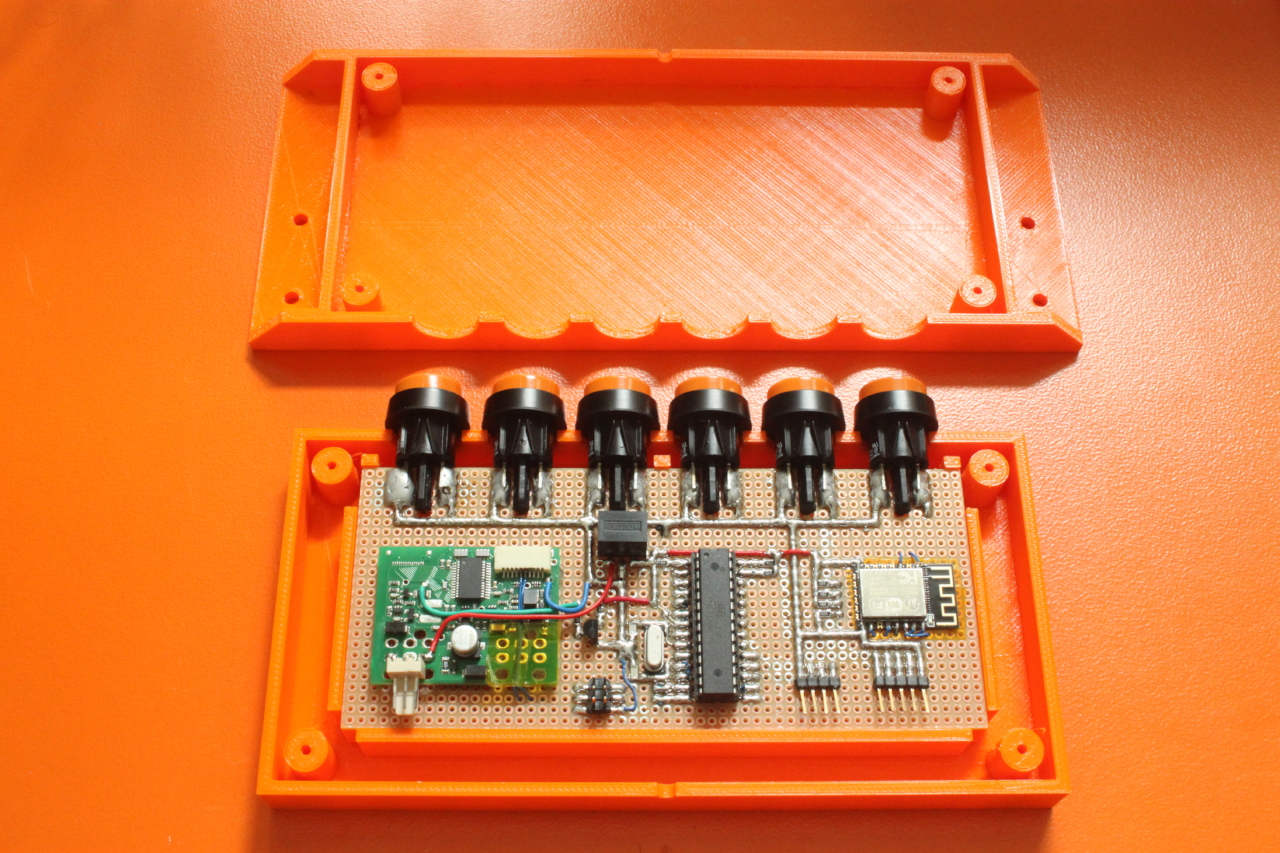
Final PCB and 3D printed Case
For this PCB i used a method in which all components are soldered on the copper side of a perfboard. You can use either SMD parts or you can bend the wires of through hole components, so that they can be soldered like SMD components. VCC and GND are soldered on the copper side and most of the signal connections are wired on the other side of the perfboard.
This is quite a fast method and allows for iterative development, because components can quickly be moved around and resoldered.
A simple case was printed, so that the controller can be mounted directly under the table.
The 123D design and STL files can be found in the smarkant-case sub-directory of the projects GitHub repository .
Arduino/ESP Firmware and Alexa Skill
The Arduino firmare source code can be found in the smarkant-arduino sub-directory and the ESP firmware source code can be found in the smarkant-esp sub-directory of the projects GitHub repository .
The Arduino code ist mostly based on Robin Reiter's code. I added handlers for the two additional buttons and request()/recieve() handlers for the I2C communication. Here is an excerpt of these two functions:
enum I2CCommand {
  I2C_CMD_NOOP,
  I2C_CMD_MOVE_STOP,
  I2C_CMD_MOVE_UP,
  I2C_CMD_MOVE_DOWN,
  ...
  I2C_CMD_READ_HEIGHT,
  ...
}

void setup() {
  Wire.begin(I2C_ADDRESS);
  Wire.onRequest(handleI2CRequest);
  Wire.onReceive(handleI2CReceive);
}

void handleI2CReceive(int numBytes) {
  uint8_t command = Wire.read();
  switch (command) {
    case I2C_CMD_MOVE_STOP:
      moveTable(STOP);
      break;
    case I2C_CMD_MOVE_UP:
      moveTable(UP);
      break;
    case I2C_CMD_MOVE_DOWN:
      moveTable(DOWN);
      break;
  ...
}

void handleI2CRequest() {
  switch (i2cReadCommand) {
    case I2C_CMD_READ_HEIGHT:
      Wire.write((const uint8_t *) & currentHeight, 2);
      break;
  ...
}
On the ESP side, we can execute these I2C commands in an MQTT message handler. The actual command is determined by the current value of the move attribute of the Smarkant's JSON object:
void tableStop() {
  log("Table stop");
  Wire.beginTransmission(I2C_ADDRESS);
  Wire.write(I2C_CMD_MOVE_STOP);
  Wire.endTransmission();
}

void awsIotMessageReceived(MQTT::MessageData& data)
{
  MQTT::Message &message = data.message;
  log("Message %s", message.payload);
  StaticJsonBuffer jsonBuffer;
  JsonObject &json = jsonBuffer.parseObject((const char *) message.payload);
  if (json.success()) {
    if (json.containsKey("state")) {
      JsonObject &state = json["state"];
      if (state.containsKey("move")) {
        const char *move = (const char *) state["move"];
        if (strcmp("stop", move) == 0) {
          tableStop();
        } else if (strcmp("up", move) == 0) {
          tableMoveUp();
        } else if (strcmp("down", move) == 0) {
          tableMoveDown();
        } else if (strcmp("position", move) == 0) {
          tableMoveToPosition((int) state["position"]);
        } else if (strcmp("height", move) == 0) {
          tableMoveToHeight((int) state["height"]);
        }
      }
    }
  }
}
The properties of the Smarkant device (current position, current movement) are stored as a JSON object in the AWS IoT backend as a "Smarkant" thing. The AWS Lambda function of the Alexa Skill uses the aws-sdk-js library to update this JSON object and sets move and position attributes to the desired position and movement:
const updateSmarkantShadow = (state, callback) => {
  iotData.updateThingShadow({
    payload: JSON.stringify({
      "state": {
        "desired": state
      }
    }),
    thingName: config.iotDeviceName
  }, (_err, _data) => {
    callback();
  });
};

const handlers = {
  'MoveUpIntent': function() {
    updateSmarkantShadow({move: 'position', position: 2}, () => {
      this.emit(':tell', i18n(this, 'smarkant_moves_up'));
    });
  },
  'MoveDownIntent': function() {
    updateSmarkantShadow({move: 'position', position: 1}, () => {
      this.emit(':tell', i18n(this, 'smarkant_moves_down'));
    });
  },
  ...
};

exports.handler = (event, context, _callback) => {
  const alexa = Alexa.handler(event, context);
  alexa.appId = config.appId;
  alexa.registerHandlers(handlers);
  alexa.execute();
};
And finally we need the Alexa intent schema and some sample sentences:
{
  "intents": [
    {
      "intent": "MoveUpIntent"
    },
    {
      "intent": "MoveDownIntent"
    },
    ...
  ]
}
MoveUpIntent to move up
MoveUpIntent and move up
MoveDownIntent to move down
MoveDownIntent and move down
...The design presented in this project can be used to control all kinds of devices with Alexa. Amazon also provides a specialized API for creating Alexa Smart Home Skills, the Smart Home Skill API . These skills provide predefined commands like "Alexa, turn on the kitchen light", with which you can control your smart home devices without the need to say the invocation name of your skill.